Run Cosmos in open-source Apache Airflow®#
Quickly get started working locally with Apache Airflow®, dbt, and Astronomer Cosmos using the Open-source Airflow.
This quickstart guide shows you how to set up a simple demo project, run a simple Dag locally with Cosmos, and then view the results with an open-source database viewer. If you want to get started working with your own project and configurations, see Get started with Open-source Airflow.
By the end of this quickstart, you will:
Set up an Airflow project
Create a Cosmos project, which includes Dags and a dbt project
Run your Dag that uses dbt to load, run, and test sample data
(Optional) View your Dag run output
Prerequisites#
1. Set up your project environment#
Create your demo project directory.
mkdir oss-quickstart
cd oss-quickstart
Create and activate a Python virtual environment in your demo directory.
python3 -m venv venv
source venv/bin/activate
Tip
If you have multiple versions of Python on your machine, and need to use an older version of Python with Airflow, be sure to create your demo virtual environment with the older Python version. For example, python3.13 -m venv venv.
If you exit your virtual environment, remember you can reactivate it by returning to your project directory and then using the source venv/bin/activate command.
Install Cosmos and SQLite into your virtual environment.
The Cosmos project includes Airflow as a dependency, so when you install Cosmos into your virtual environment, it automatically installs Airflow as well.
pip install astronomer-cosmos dbt-sqlite
2. Create your Cosmos project structure#
Set up separate subdirectories in your demo directory for Dags and dbt project:
mkdir dags
mkdir -p dbt_project/micro_project
Your project structure should look like this:
oss-quickstart
├── dags/
└── dbt_project/micro_project/
3. Create a minimal dbt project#
For the demo dbt project, you need to make some essential components for your project. The dbt commands for this demo take two SQL files, a base_model that creates a table with greetings in your database, and an enriched_model table that has transformed values for greetings in the base model.
Create your
dbt_project.yml
touch dbt_project/micro_project/dbt_project.yml
Add the following content to your new project definition.
name: 'micro_project'
version: '1.0'
profile: 'micro_project'
model-paths: ["models"]
Create your dbt project’s
profiles.yml. Cosmos can use this file to connect Airflow to your dbt database, without you needing to specify an Airflow connection.
touch dbt_project/micro_project/profiles.yml
Add the following content to your
profiles.yml, and be sure to replace<explicit-path-to-demo-project>with your path:
micro_project:
target: dev
outputs:
    dev:
    type: sqlite
    threads: 1
    database: "my_database.db"
    schema: main
    schema_and_paths:
            main: <explicit-path-to-demo-project>/oss-quickstart/my_database.db
    schema_directory: <explicit-path-to-demo-project>/oss-quickstart
Tip
You can check the formatting and structure of your dbt SQLite connection with the dbt-sqlite reference docs.
Create a simple dbt model in the
micro_projectmodels:
mkdir -p dbt_project/micro_project/models
echo "select 1 as id, 'hello' as greeting" > dbt_project/micro_project/models/base_model.sql
Create your enriched dbt model using the following commands:
touch dbt_project/micro_project/models/enriched_model.sql
Open the
enriched_model.sqlfile and add the following commands:
select
    id,
    greeting,
    upper(greeting) as greeting_upper,
    length(greeting) as greeting_length
from {{ ref('base_model') }}
4. Create an Airflow Dag#
Now, in your
dagsdirectory, create an Airflow Dag with the following commands:
touch dags/micro_project_dag.py
Add the following Dag Python code to your new file.
This Dag tells Airflow and Cosmos where to find the dbt project and profile configurations, which they use to execute the dbt code and write results to the database. This Dag does not include any scheduling information, so you need to manually trigger Dag runs from the Airflow UI or CLI when you Run Airflow at a later step.
import pathlib
import os

from cosmos import DbtDag, ProjectConfig, ProfileConfig

DBT_PROJECT_PATH = (
    pathlib.Path(os.getenv("AIRFLOW_HOME", pathlib.Path(__file__).parent.parent))
    / "dbt_project/micro_project"
)

micro_project_dag = DbtDag(
    dag_id="micro_project_dag",
    project_config=ProjectConfig(
        dbt_project_path=DBT_PROJECT_PATH,
    ),
    profile_config=ProfileConfig(
        profile_name="micro_project",
        target_name="dev",
        profiles_yml_filepath=DBT_PROJECT_PATH / "profiles.yml",
    ),
)
5. Set environment variables#
To successfully launch, Airflow needs you to define the some environment variables. These identify the project home directory, AIRFLOW_HOME, and disable additional Airflow and Cosmos features that are not required for local execution.
export AIRFLOW_HOME=`pwd`
export AIRFLOW__CORE__LOAD_EXAMPLES=false
export AIRFLOW__COSMOS__ENABLE_TELEMETRY=false
6. Run Airflow#
At this point, you have completed the following project setup steps:
Installed Cosmos, dbt, and Airflow into your environment.
Created a lightweight dbt project and defined the
profiles.ymlfile, which Cosmos can use to connect to the dbt database.Created an Airflow Dag that defines the
project_configandprofile_config, which tells Cosmos the locations of the dbt project andprofiles.ymlfile.Defined the Airflow project home and configured environment variables.
Launch Airflow by using the
airflow standalonecommand, which initializes the database, creates a user, and starts all components atlocalhost:8080.
airflow standalone
Airflow autogenerates credentials when it launches that you must use to access the local Airflow UI. Open the
simple_auth_manager_passwords.json.generatedfile in youross-quickstartdirectory. This file contains the{"username": "password"}key-value pair for you to use to login tolocalhost:8080. Use this username and password to log in.
7. Trigger your Dag#
Open the Dags view in Airflow.
Click Trigger to run your Dags.
After the Dag successfully finishes, you can explore the Airflow UI Dag views to view the logs or check the Dag code.
8. (Optional) View results with a database viewer#
To view the transformations completed by the Dag, you must use a database viewer to access the views and materializations completed by your dbt project.
Open dBeaver.
Click Database on the main menu and then New database connection.
Select SQLite from the list of database types.
Add your database connection information for the Path. This path is defined in the
schema_and_paths.mainconfiguration that you defined in yourprofiles.ymlfile:
micro_project:
target: dev
outputs:
    dev:
    type: sqlite
    threads: 1
    database: "my_database.db"
    schema: main
    schema_and_paths:
            main: <explicit-path-to-demo-project>/oss-quickstart/my_database.db
    schema_directory: <explicit-path-to-demo-project>/oss-quickstart
Click Finish. dBeaver asks for permission to download the necessary drivers to access and display the database information.
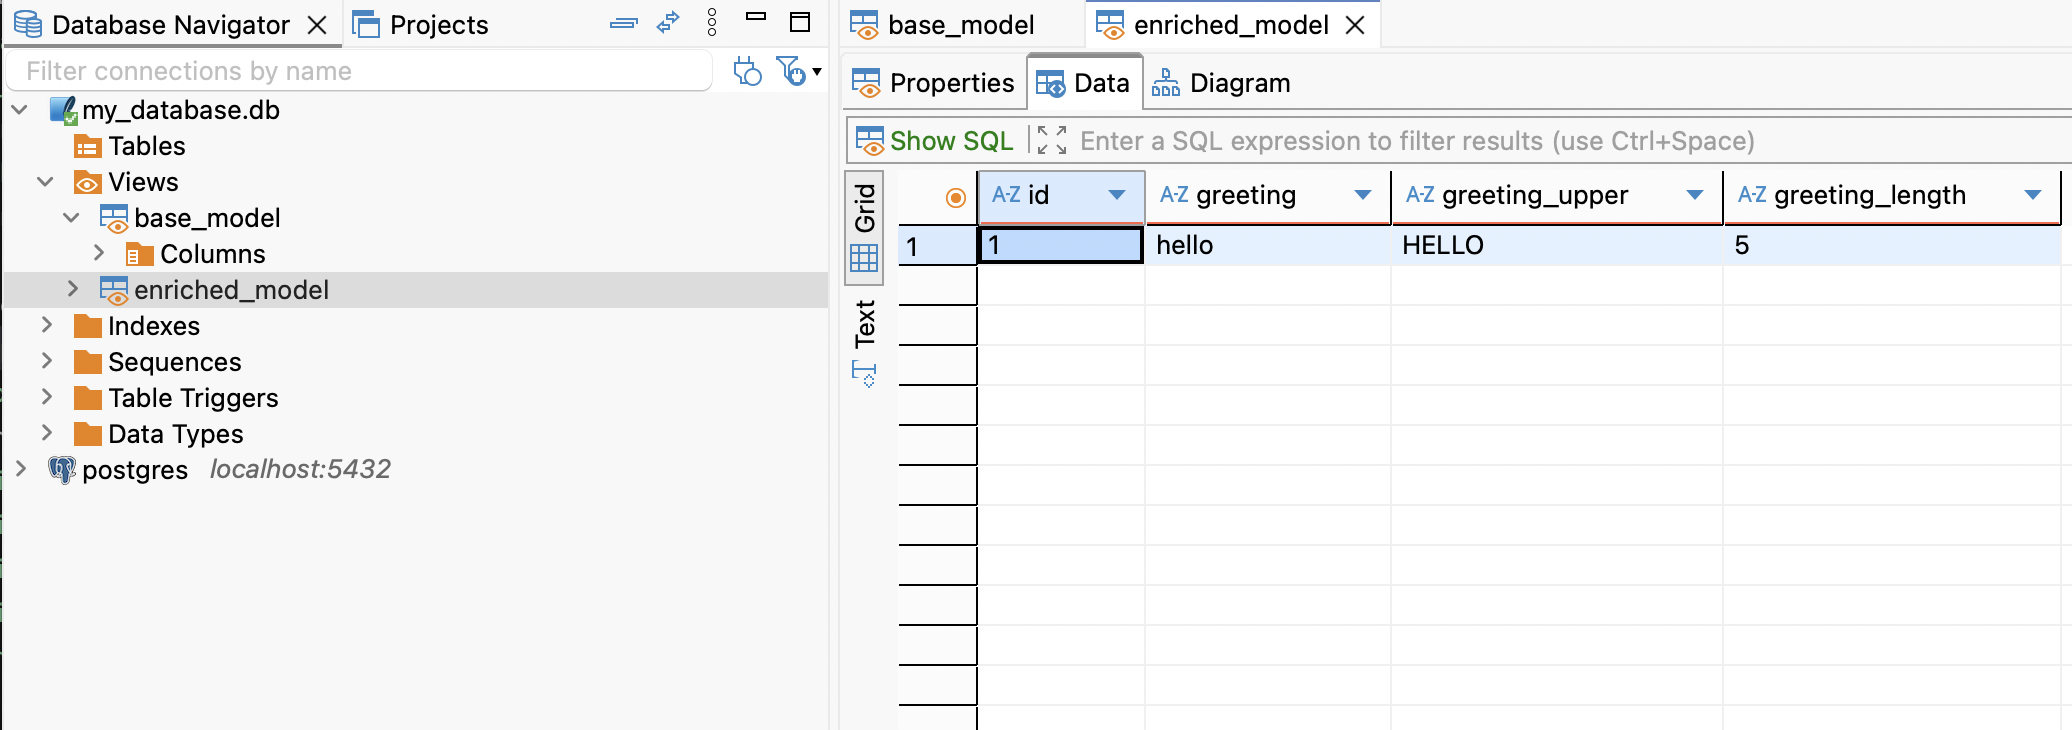
After the database connection is successful, dBeaver displays the SQLite project directory. Navigate to Views at
mydatabase.db/viewsto view the different table views created by dbt.base_model and enriched_model are the final Table views produced by the dbt code. Click any of these tables and then choose the Data tab to see the dbt output.
Troubleshooting the quickstart#
Can’t log in to the Airflow UI#
Confirm that you are using a version of Python that is supported by Airflow. These versions are usually included in the Airflow installation guide.
If you try to log in to the Airflow UI and see a 500 Internal Server Error or Invalid credentials, this can be caused by using the wrong configuration for your SQLite setup.
To resolve, open your profiles.yml file and confirm that you correctly included:
The
schema_and_paths:attributeThe path you used to define the location of your schema and database
If these are correctly formatted, go to your terminal and confirm that you set the
AIRFLOW_HOMEenvironment variable.
echo $AIRFLOW_HOME
Dags do not load#
If you encounter issues, like error messages that say Cosmos Dag not loading or the Dags page on your Airflow UI does not show your Dags, try resetting the Airflow database and reserializing with the following commands.
airflow db reset
airflow dags reserialize
Then, relaunch Airflow with airflow standalone.
Example Dags stall#
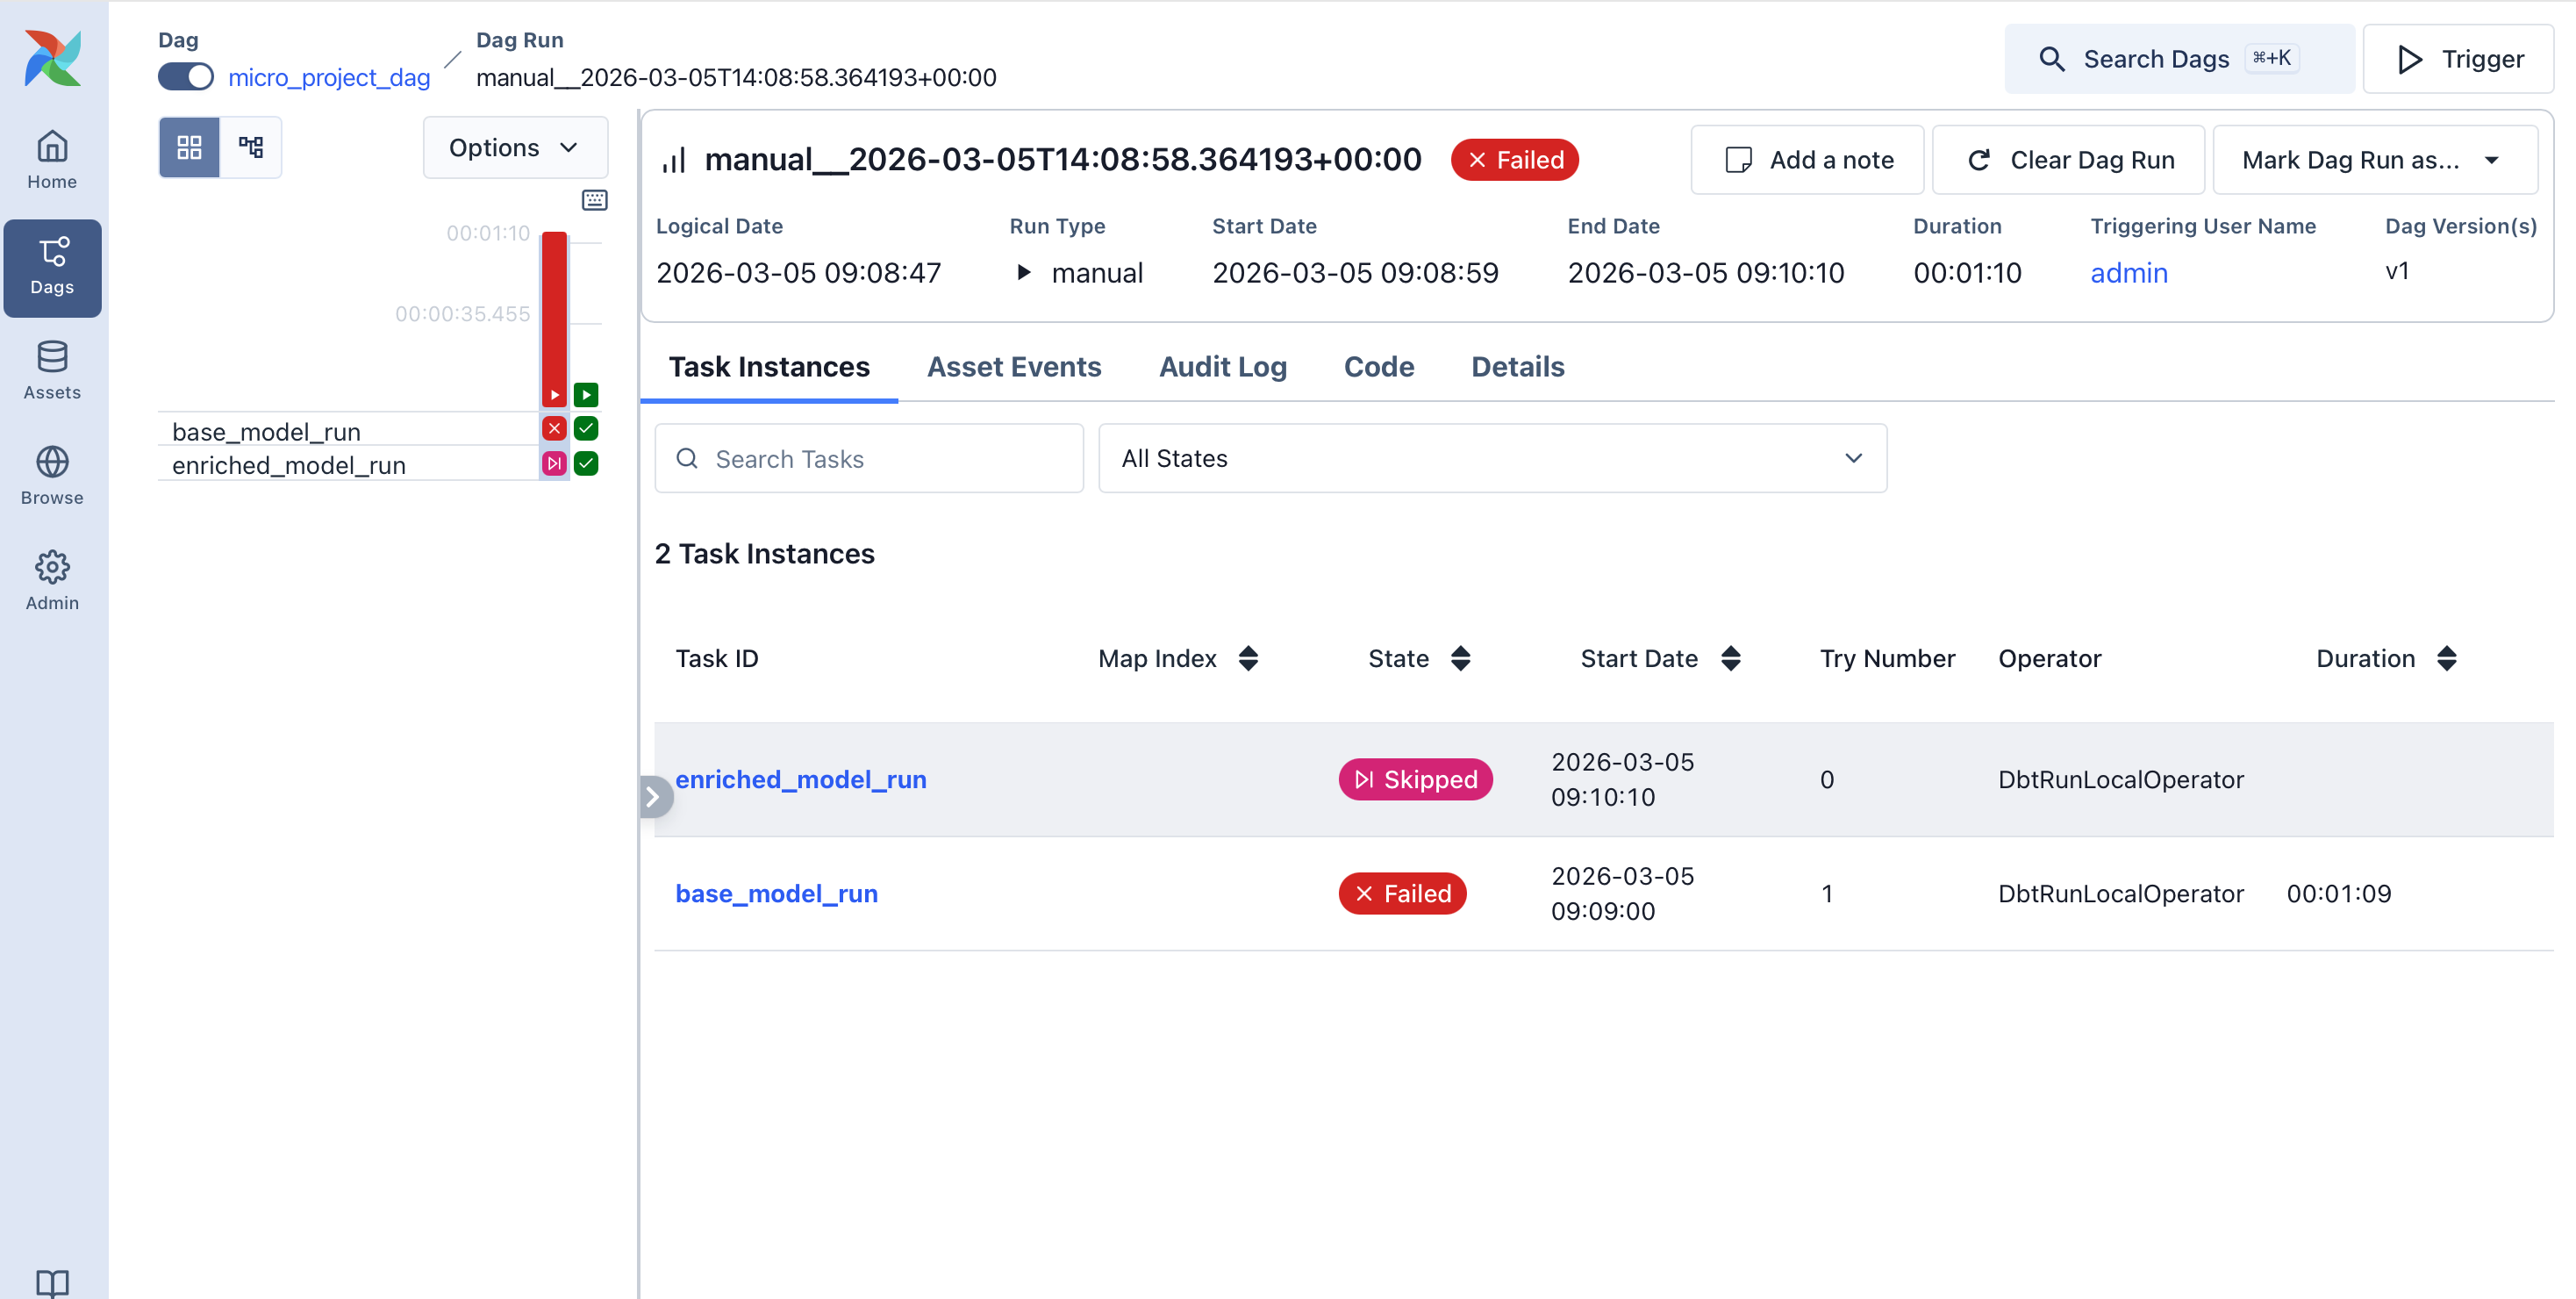
If your base_model_run Dag gets stuck in Running mode, even though the Logs show that it completed successfully, and the next Dag does not automatically start.
In the Dag view of the Airflow UI, click Mark Dag run as… and choose Failure.
Click Trigger to run the Dags again.
If this does not work, reset the Airflow database and reserialize the Dags using the following code:
airflow db reset
airflow dags reserialize
Try running the Dags again from the Airflow UI.